I used to spend hours filtering keywords in Excel.
Not anymore.
Keyword Filter Pro is fast and FREE.

I think once you’ve tried it, you’ll never go back to Excel.
Here’s how to get started…
How To Filter Your Keywords Using Keyword Filter Pro (Video)
If you’ve got a big list of keywords and you just need to find the best keywords, here’s an easy and fast way to do that.
I tried to make it really easy to use Keyword Filter Pro when I developed it.
I’ll show you all the simple steps below…
However, if you’d rather just see everything step by step, here’s the training video:
7 Step Keyword Filtering System
Step 1: Gather your keyword lists
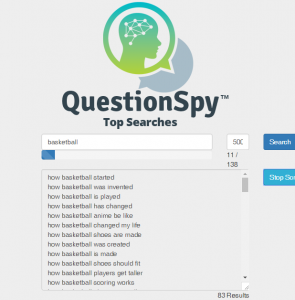
I like to find all the questions people are asking, and then answer them in blog posts. It makes content marketing super easy and these questions rank fast too.
Ok, the very first thing you have to do is get some keywords.
It really doesn’t matter where you get them from.
Most people like the Google Adwords Keyword Planner Tool.
There are literally hundreds of good tools you can use to find keywords.
I like to find question keywords and Amazon keywords. These keywords are less competitive because everyone else likes to use the same keyword tools. Always think outside the box to stay ahead of your competitors.
For this case study, I’m just going to use a big list of basketball keywords as a sample.
This will work in any market or niche, because we are just filtering existing keywords.
Once you have a big list, you’re ready for the next step…
Step 2: Open Keyword Filter Pro
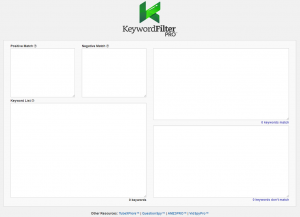
Using Chrome, Firefox, or Safari, navigate to https://marketbold.com/KeywordFilterPro/
(You can bookmark that page so you always have it handy.)
The tool is completely free, and you’re ready to now go to the next step…
Step 3: Paste in your keywords

So, in the lower left hand corner, you’ll see the big box for pasting in your keywords.
Just copy and paste all the keywords you’ve collected and put them in this box.
Don’t worry about duplicates. (Keyword Filter Pro will take care of duplicate keywords automatically)
After you have pasted in your big list of keywords, then you will see the keyword count at the bottom. More about that in a bit, but just know that is the total number of keywords, including any duplicate values.
Step 4: Filter for positive keywords
Now for the fun part.
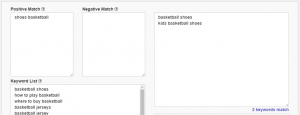
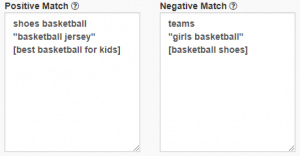
Just above the Keyword List box, you will see a box called “Positive Match”.
This is where you’re going to type in the keywords that represent your potential customers.
For example, if we were selling basketball jerseys, we would just type in “basketball jersey” or “basketball jerseys” (no quotes for either)
There are 3 different match types available, so let me explain how this works.
Broad Match: This will match any words, regardless of the order of the words. (ex. shoes basketball, would match the keyword “basketball shoes”)
Phrase Match: This will match any words, as long as the exact phrase appears in the same order in a keyword. (ex. “shoes basketball” would only match keywords with that exact phrase in that same word order)
Exact Match: This will match the exact keyword.
Clear as mud?
Ok, if that still is a little fuzzy, one of the easiest ways that I’ve found to learn this is to just start with 5-10 keywords and then test some different combinations to see how they work.
It’s actually really simply once you get the hang of it.
And if you’ve ever used Google Adwords before, then you’re already familiar with these three match types, as they are also used in many PPC platforms.
Once you have a good list of keywords, you’re ready for some further refining.
Step 5: Remove negative keywords

In the upper right hand corner, you have your matched keywords.
But what you always find is that some of these keywords still contain words that reveal they aren’t really your ideal target market.
For example, if you only sell youth basketball jerseys, then a keyword like “adult basketball jerseys” would not be a good keyword for you to target.
The next step is to do some more fine tuning of your keyword targeting.
For this part, we use the Negative Match section.
This section also has the 3 match types, and they match the same way, so I won’t go over that again.
The big difference is that as you use the Negative Match keywords, it will remove those keywords which are not good targets for your final keyword list.
Again, I would recommend that you start with a small list of 5-10 keywords and just test some different patterns for the match types if this is a little bit confusing.
Step 6: Copy your filtered keyword list
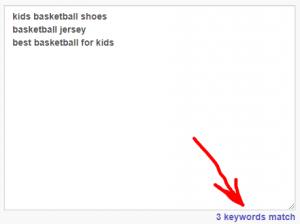
In the lower right corner, you can see all the keywords that didn’t match.
I usually scan down those to see if there were any good keywords that I missed, then I try to determine what positive/negative pattern would get those keywords in my list.
Eventually, you’ll be completely satisfied with the list you have, and you’re ready to use it.
Below the positive match box, there is a link that contains the number of keywords in your list.
Just click that link, and the entire list of filtered keywords will be added to your clipboard.
You can then paste those keywords into any file to save for later.
Also, below the text box that contains the keywords that did not match, you can copy those keywords as well, to save for later.
Step 7: Save your match lists (Optional)
That was fast…
Much faster than Excel.
And now that you’re finished and you have a great keyword list, I would recommend you do one more thing.
I think you should save both the positive match and negative match keywords that you filtered by in a file.
The reason for this is because then if you decide to come back and filter another list of keywords, you don’t have to think about this again.
You can simply reuse the same filtering rules for the future.
Also, one other big benefit is that you can use the Negative Match keywords as a filter inside Google Adwords or Bing Adcenter if you want to prevent your ads from showing for these keywords.
And that’s it.
Let me know if you have any questions below…
Or if you have a feature that you’d like to see added…

0 Comment
Reply